Cisco VoIP Phone Adaptor Setup
Plug in the Cisco ATA device into your LAN as per the package instructions. Plug in an analogue phone of your choice into the Cisco ATA. To access the voice menu unhook your phone and press the button on the Cisco ATA.
You first need to ensure that your Cisco is configured for SIP. Please check with your supplier.
- Access the voice menu again and press 21#. The Cisco ATA will read out an IP Address. Enter this address into a web browser like so http://PHONE IP ADDRESS/dev where PHONE IP ADDRESS is the IP Address read out by the Cisco ATA. You should see the configuration page in front of you.
-
Define your IP settings as shown on the image below.
The image below displays typical settings for a NAT-based network. If you have a fixed public IP Address please enter the settings as appropriate. -
Set your SIP Account settings as shown below.
Set UID0 equal to your VoIPtalk user ID and PWD0 equal to your VoIPtalk password. - Set your SIP Registration settings exactly as displayed below.
-
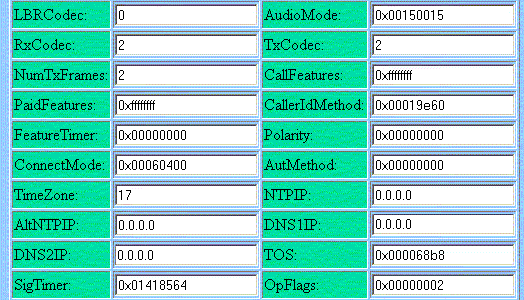
Make sure your Codec and DNS settings are defined as displayed in the image below.
You can set the value of DNS1IP or DNS2IP to any other optional value (for example if you have a public fixed IP Address). - Press the APPLY button and refresh the page to validate that your changes have been saved. Dial 902 from your phone and you should hear the VoIPtalk confirmation message.


