AYC IPcts PBX Setup Guide
WARNING DO NOT PUT THE AYC PBX ON A REAL WORLD IP ADDRESS OR IN A DMZ
Guide to setup AYC PBX with the VOIPtalk service, using two gateways to work-round a bug that prevents outbound calls.
Assuming you already have a voiptalk SIP account.
- log into the AYC PBX (default address http://10.0.0.100:8801).
- Setup The First Gateway,
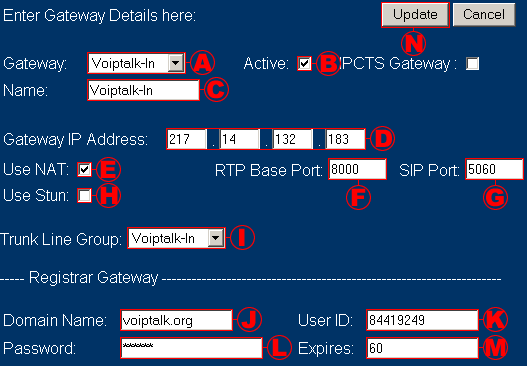
Navigate to the 'Routes > GateWay' page.- select Gateway '1' or 'Voiptalk-In'.
- tick the 'Active' check box.
- set 'Name' to 'Voiptalk-In'.
- set 'Gateway IP Address' to the IP address of voiptalk.org (217.14.132.183).
- if you are using NAT tick the 'Use NAT' check box.
- set 'RTP Base Port' to '8000'.
- set 'SIP Port' to '5060'.
- always untick the 'Use Stun' check box.
- set the 'Trunk Line Group' to 1.
- set 'Domain Name' to 'voiptalk.org'.
- set 'User ID' to your voiptalk account ID.
- set 'password' to your 6 digit voiptalk account password.
- set 'Expires' to '60' (if you have NAT problems you may want to set it to a lower value like 5).
- click the update button.
- Setup The Second Gateway,
Navigate to the 'Routes > GateWay' page.- select Gateway '2' or 'Voiptalk-Out'.
- tick the 'Active' check box.
- set 'Name' to 'Voiptalk-Out'.
- set 'Gateway IP Address' to the IP address of one of our gateways (217.14.132.184).
- if you are using NAT tick the 'Use NAT' check box.
- set 'RTP Base Port' to '8004'.
- set 'SIP Port' to '5060'.
- always untick the 'Use Stun' check box.
- set the 'Trunk Line Group' to 2.
- set 'Domain Name' to 'voiptalk.org'.
- set 'User ID' to your voiptalk account ID.
- set 'password' to your 6 digit voiptalk account password.
- set 'Expires' to '60' (if you have NAT problems you may want to set it to a lower value like 5).
- click the update button.
- Setup The First Trunk Group,
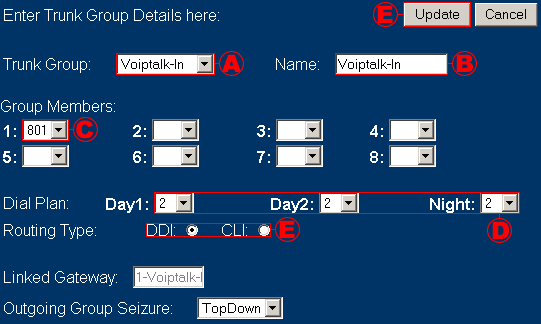
Navigate to the 'Groups > Trunk Groups' page.- select Trunk Group 1.
- set 'Name' to 'Voiptalk-In'.
- set 'Group Members' - '1' to '820', '2' to '821', '3' to '822' and '4' to '823'.
- set 'Dial Plan' - 'Day1', 'Day2' and 'Night' to '2' or 'Voiptalk-In'.
- set 'Routing Type' to 'DDI'.
- click the update button.
- Setup The Second Trunk Group,
Navigate to the 'Groups > Trunk Groups' page.- select Trunk Group 2.
- set 'Name' to 'Voiptalk-Out'.
- set 'Group Members' - '1' to '824', '2' to '825', '3' to '826' and '4' to '827'.
- set 'Dial Plan' - 'Day1', 'Day2' and 'Night' to '2' or 'Voiptalk-In'.
- set 'Routing Type' to 'DDI'.
- click the update button.
- Setup The First Route,
Navigate to the 'Routes > Routes' page.- select Route 1.
- set 'Name' to 'Voiptalk-In'.
- set the 'From Day', 'To Day', 'From Hr' and 'To Hr' to 'Sun', 'Sat', '0' and '23' respectfully.
- set 'Trunk Group1' to '2' or 'Voiptalk-Out' (Yes set it to 'Voiptalk-Out').
- set 'Dialling mask1' to 'S'.
- click the update button.
- Setup The Second Route,
Navigate to the 'Routes > Routes' page.- select Route 2.
- set 'Name' to 'Voiptalk-Out'.
- set the 'From Day', 'To Day', 'From Hr' and 'To Hr' to 'Sun', 'Sat', '0' and '23' respectfully.
- set 'Trunk Group1' to '2' or 'Voiptalk-Out'.
- set 'Dialling mask1' to 'S'.
- click the update button.
- Setup Dial Plan For Outbound Calls,
Navigate to the 'Routes > Dial Plan' page.- select Dial Plan '0' or 'Default'.
- set 'Name' to 'Default'.
- make sure you have the following patterns in this order (these are default).
9[5-8]XXXXV Route 2 90[1-9]XXXXXXXXV Route 2 900[1-9]XXXXXXXXVV Route 2 - click the update button.
- Setup Dial Plan For Inbound Calls,
Navigate to the 'Routes > Dial Plan' page.- select Dial Plan '2'.
- set 'Name' to 'Voiptalk-In'.
- make sure you have the following patterns in this order (remember to use your own VOIPtalk ID instead of 84419249).
2XX Extn 0 3[0-7]X Group 0 84419249 Destination 1 - click the update button.
- Setup Destination,
Navigate to the 'Routes > Destinations' page.- select Destination '1'.
- set 'Name' to 'Voiptalk-In'.
- set 'Destination' - 'Day1', 'Day2' and 'Night' to '200'
- click the update button.
- If you are behind NAT,
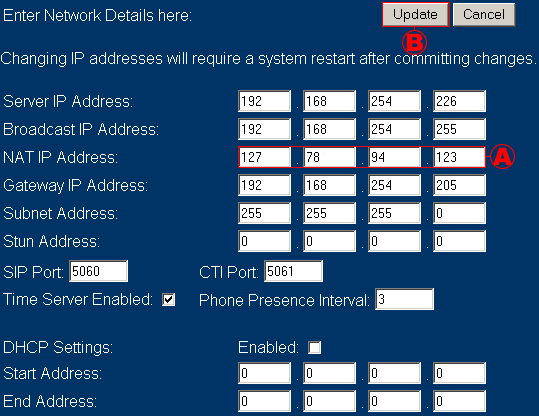
Navigate to 'Network > System IP'- set 'NAT IP Address' to your external IP address.
- click the update button.
- on your NAT router port forward '5060', '5065', '8000'-'8700' UDP in and out to the internal ip address of the AYC PBX.


