Configuration Of SIP Trunk With Switchvox For Use With VoIPtalk Setup
This is a guide how to configure a SIP trunk on Switchvox PBX http://www.switchvox.com/ for use with VoIPtalk Service http://www.voiptalk.org.
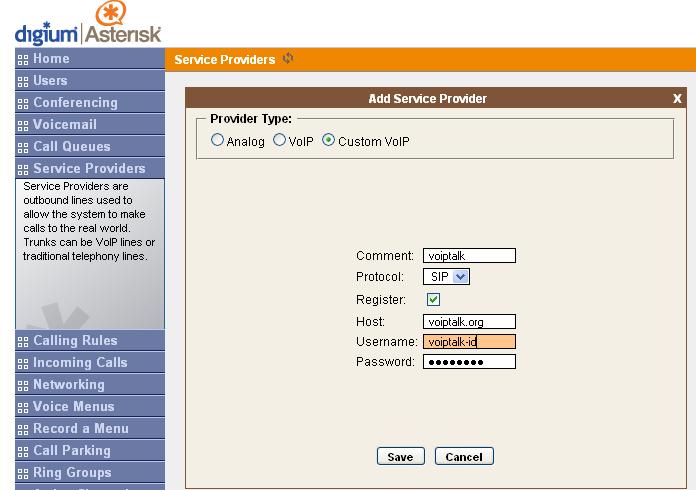
- For the first you have to add a new VoIP Provider. Click on System Setup tab and select VoIP Providers from the menu.
- Select SIP Provider from Add New drop down menu and click on Go button.
-
Enter in the fields the following data:
SIP Provider Name: Voiptalk
Your Account ID: VoIPtalk ID
Your Password: VoIPtalk SIP password
Hostname/IP Address: voiptalk.org
Callback function: Enter any extension to receive incoming calls on this trunk by default
DTMF Mode: RFC2833
And click Add SIP provider button. This should create a SIP trunk and should register to voiptalk.org providing you entered the right details. To check if the trunk is resisted, click Diagnostic Tab and select System Status. If the trunk is registered, under VOIP Providers it should show as registered. - To check if the trunk is resisted, click Diagnostic Tab and select System Status. If the trunk is registered, under VoIP Providers it should show as registered.
-
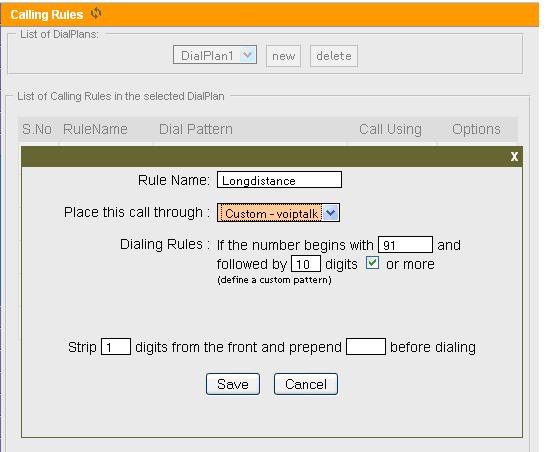
Outgoing calls setup using VoIPtalk Trunk.
Click on System Setup tab and select Outgoing calls. - Add a new plan or modify the dialling name Local. For example the dial plan on the image will allow extensions to dial out 11 digit long number on this trunk using 9 as prefix.
-
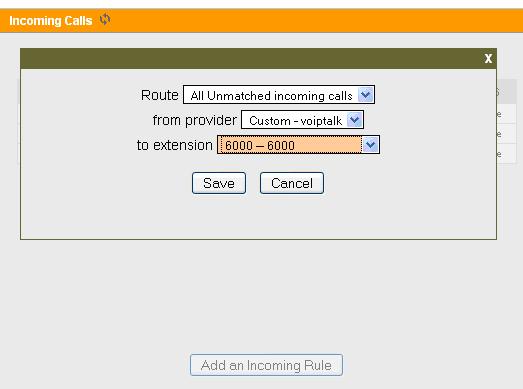
Incoming calls setup using VoIPtalk Trunk
Click on System Setup tab and select Incoming calls - Under Incoming call routes, click on Add route button. Enter your incoming number in Route Number, select SIP Provider in from field, select VoIPtalk from next drop down menu and enter the extension number you want to dial for this incoming number and press Save button.
-
Set your Dialling plan for your VoIPtalk incoming number:
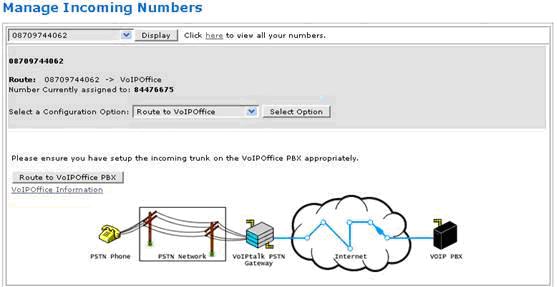
You need to set the routes for your incoming numbers on www.voiptalk.org to get incoming calls working. To do this go to http://www.voiptalk.org and click on my account tab page. Enter your email address and your VoIPtalk user password. (This is not the SIP account password). - Then you will see the list of your VoIPtalk IDs and associated incoming numbers, click on the incoming number you want to use with VoIPtalk-SIP trunk on your switchvox. This will present you the manage incoming number.
- Select the Select a Configuration Option to Route to VoIPOffice, and click the route to VoIPOffice PBX button.
Dial your incoming number and this should ring the selected extension on Switchvox.
Dial your incoming number and this should ring the selected extension on Switchvox.

Dial your incoming number and this should ring the selected extension on Switchvox.
Dial your incoming number and this should ring the selected extension on Switchvox.
Dial your incoming number and this should ring the selected extension on Switchvox.

Dial your incoming number and this should ring the selected extension on Switchvox.
Dial your incoming number and this should ring the selected extension on Switchvox.

Dial your incoming number and this should ring the selected extension on Switchvox.
Dial your incoming number and this should ring the selected extension on Switchvox.

Dial your incoming number and this should ring the selected extension on Switchvox.

Dial your incoming number and this should ring the selected extension on Switchvox.

