UTS F1000 Wireless VoIP Phone Setup
-
The most complicated part of configuring your phone is ensuring that it obtains an IP address (ie connecting it to the wireless network) and retrieving that IP address so that you can configure your phone for use with VoIP. Before you start, make sure:
- Your WiFi phone is fully charged.
- There is a Wireless network in range, see phone manual for more details.
- You have access to that network using a WPA PSK Key or a WEP Key, for example. For more information you will have to contact your network administrator or take a look at the settings on your Wireless Router / Access Point.
-
After the phone has booted up, you will have to go through the following steps to verify the IP Address:
- Press the Menu button.
- Scroll down to WiFi-Settings and click OK. A notice will appear on the screen, click OK again.
- Select Net Search option and click OK. A list of SSID (names of available wireless access points) will appear onscreen.
- Select the correct device from the list and press SAVE. Press SAVE again at the prompt.
- Select Security Mode from the options list and press OK.
- Choose the security mode from the list specified by your network administrator (eg WEP Key or WPA-PSK, etc) and press OK.
- Configure the parameters presented based on your chosed security mode. For example, for WPA-PSK, define the PSK key. Press OK to save.
- Select Activate and press OK.
Phone will connect to AP and it will pick up the IP address from DHCP server on your DHCP server.
To obtain the IP Address, press Menu, scroll down to WiFi-Settings and click OK.
- Select Network Parameter and press OK.
- Your IP Address will show up on the screen! Make a note of it.
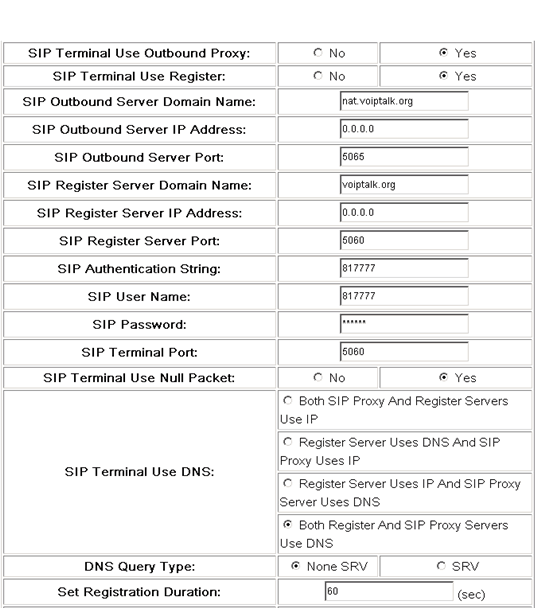
- Type the IP Address into the web browser of a local PC. At the password prompt, Login: admin and Password: psw. The welcome screen should appear. Click on USER MENU on the left and then click on SIP and RTP Config. The screen below will appear:
-
Please ensure that you configure all settings as shown above. Make sure to set:
SIP Proxy Domain Name to: nat.voiptalk.org
SIP Proxy Port to: 5065
SIP Register Domain Name to: voiptalk.org
SIP Register Port to: 5060
SIP Authentication String and SIP Terminal User Name to your VoIPtalk ID
SIP Terminal Password to your six character VoIPtalk Password
SIP Terminal Port to: 5060
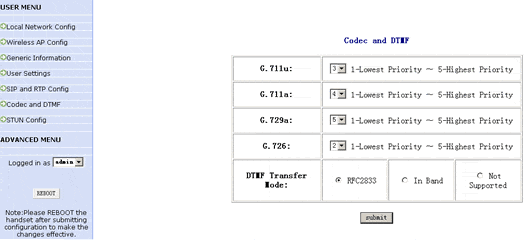
Click on submit to save your settings. - Click on Codec and DTMF on the left, the screen below will appear:
-
Due to the bandwidth sensitivity of WiFi, we advise setting your codecs in the following priority:
G.729 - Priority 5
G.711a - Priority 4
G.711u - Priority 3
G.726 - Priority 2
* If your VoIP provider supports G726 or you are communicating with other devices that you know support G726, you can set this to a higher priority. Click on submit to save your settings. - Click on the REBOOT on the left to reboot your phone. Following reboot, dial 902 to verify your settings, you should hear a welcome message.


