Siemens C460IP VoIP Setup
Note: Siemens Gigaset handset is registered with the base unit by default.
To register it again or if you are registering an additional headset with the base station, please follow the instructions on page 31 of the User Manual.
To configure the Siemen Gigaset C460IP please follow these instructions.
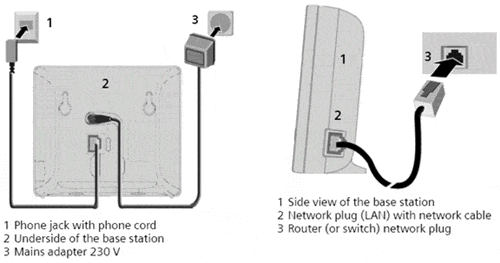
- Connect the base station's network port (on the side of the unit) to a network switch or into an ethernet port of your router.
- Connect your handset phone line to the base station's phone port (located on the reverse side of the base station).
- Power up the base station.
- The base unit will pick up an IP Address from your router's DHCP server by default. To retrieve the IP address, pick up the handset and press the menu key. Scroll down to settings and press OK then scroll down to Base and press OK. Scroll down to Local Network and press OK. You will be prompted for the system PIN which is set to 0000 by default. Enter the PIN, press OK and scroll down to the IP address option and press OK. The IP address will show up on the screen of the handset.
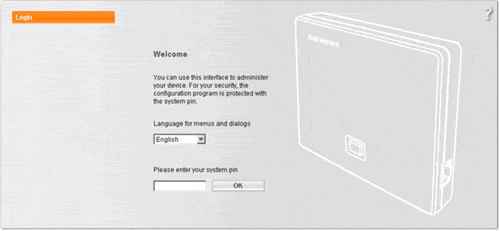
- Open a web browser on a PC connected on the same network and enter the IP address you retrieved in Step 4. You will see the login screen with a Welcome message. Enter the base PIN (0000) and click on the OK button.
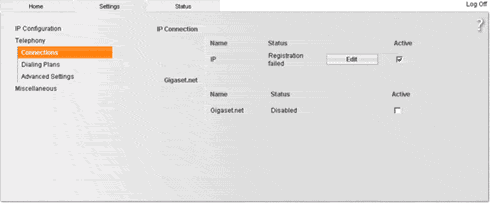
- Select the Settings tab from the top of the screen and select the Telephony link from the left side of the screen. You will see your connection details. Uncheck the Active option under the Gigaset.net heading and click on the Edit button under IP Connection heading to bring up the SIP settings.
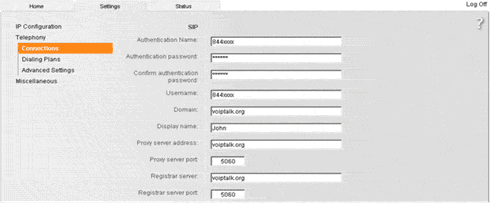
- In the SIP settings, set: Authentication Name and Username to your VoIPtalk ID, Authentication password and Confirm authentication password to your six character VoIPtalk Password, (to retrieve your VoIPtalk password go to your account page and click on your VoIPtalk ID)Domain and Registrar server to voiptalk.org, Proxy server port and Registrar server port to 5060. Enter your name in the Display name field.
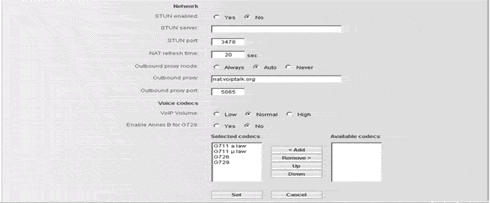
- In the Network section make sure that the Stun enabled option is set to No. Set Outbound proxy to nat.voiptalk.org and Outbound proxy port to 5065.
- Scroll down to the end of page and press the Set button to save your settings.
- You will be redirected to the status page. If all the details were entered correctly and your Internet connection is working the IP Connection Status should indicate registered.
- To confirm your settings, dial 902 from your handset. You should hear a congratulatory message thanking you for your hard work!
